


7 flower hacks for arranging flowers at home like a pro.

I’m no florist, but I have been making flower arrangements at home since I was a kid, for fun. Sometimes for myself and sometimes for parties, friend’s weddings, etc. So, while I might not be a pro, I do have a lot of practice under my belt. And I’ve learned a lot through trial and error. I also made all of the floral arrangements, bouquets, and boutonnieres for my own wedding. Which I learned so much from.
So, I thought I would share 7 flower hacks I’ve picked up along the way that can help you get a professional looking arrangement in less than ten minutes. With grocery store flowers! Nothing fancy needed.
First things first, I get the majority of my grocery store flowers from Trader Joe’s. They always have a decent selection of flowers (better than your standard grocery store) and the prices are too good to pass up. Like $5.99 per bunch for ranunculus, which is SUCH a good deal.
That’s where I got all the flowers for the arrangements I made in this post. Which include: ranunculus (I think I got 6 bunches in total), one bunch of lepidium (greenery), one bunch of camomile flowers, one bunch of wax flowers, and one bunch of safflower (the one with the green pod like shape with the orangey-yellow thistle coming out).
That makes a total of ten bunches of flowers and it totaled $65. From that amount of flowers, I was able to make four floral arrangements. If you don’t have a Trader Joe’s near you, Whole Foods usually has a good flower selection too.
So! Now that you know all the flowers I used, let’s get into my flower hacks for creating floral arrangements like a pro…

7 Flower Hacks for Arranging like a Pro
1. Keep things loose and asymmetrical.
When it comes to flower arranging, loose asymmetry is the name of the game.
Flowers are wild and organic, and flower arrangements (at least in my opinion) should feel that way too. So mix up the levels. Cut some long stems, some short stems, and everything in between.
The secret to whimsical feeling arrangements is allowing the stems to do the talking. So if you have a curved ranunculus stem, use that to your advantage and let those stems wonder off in the arrangement, like they would in a field. If that makes sense.
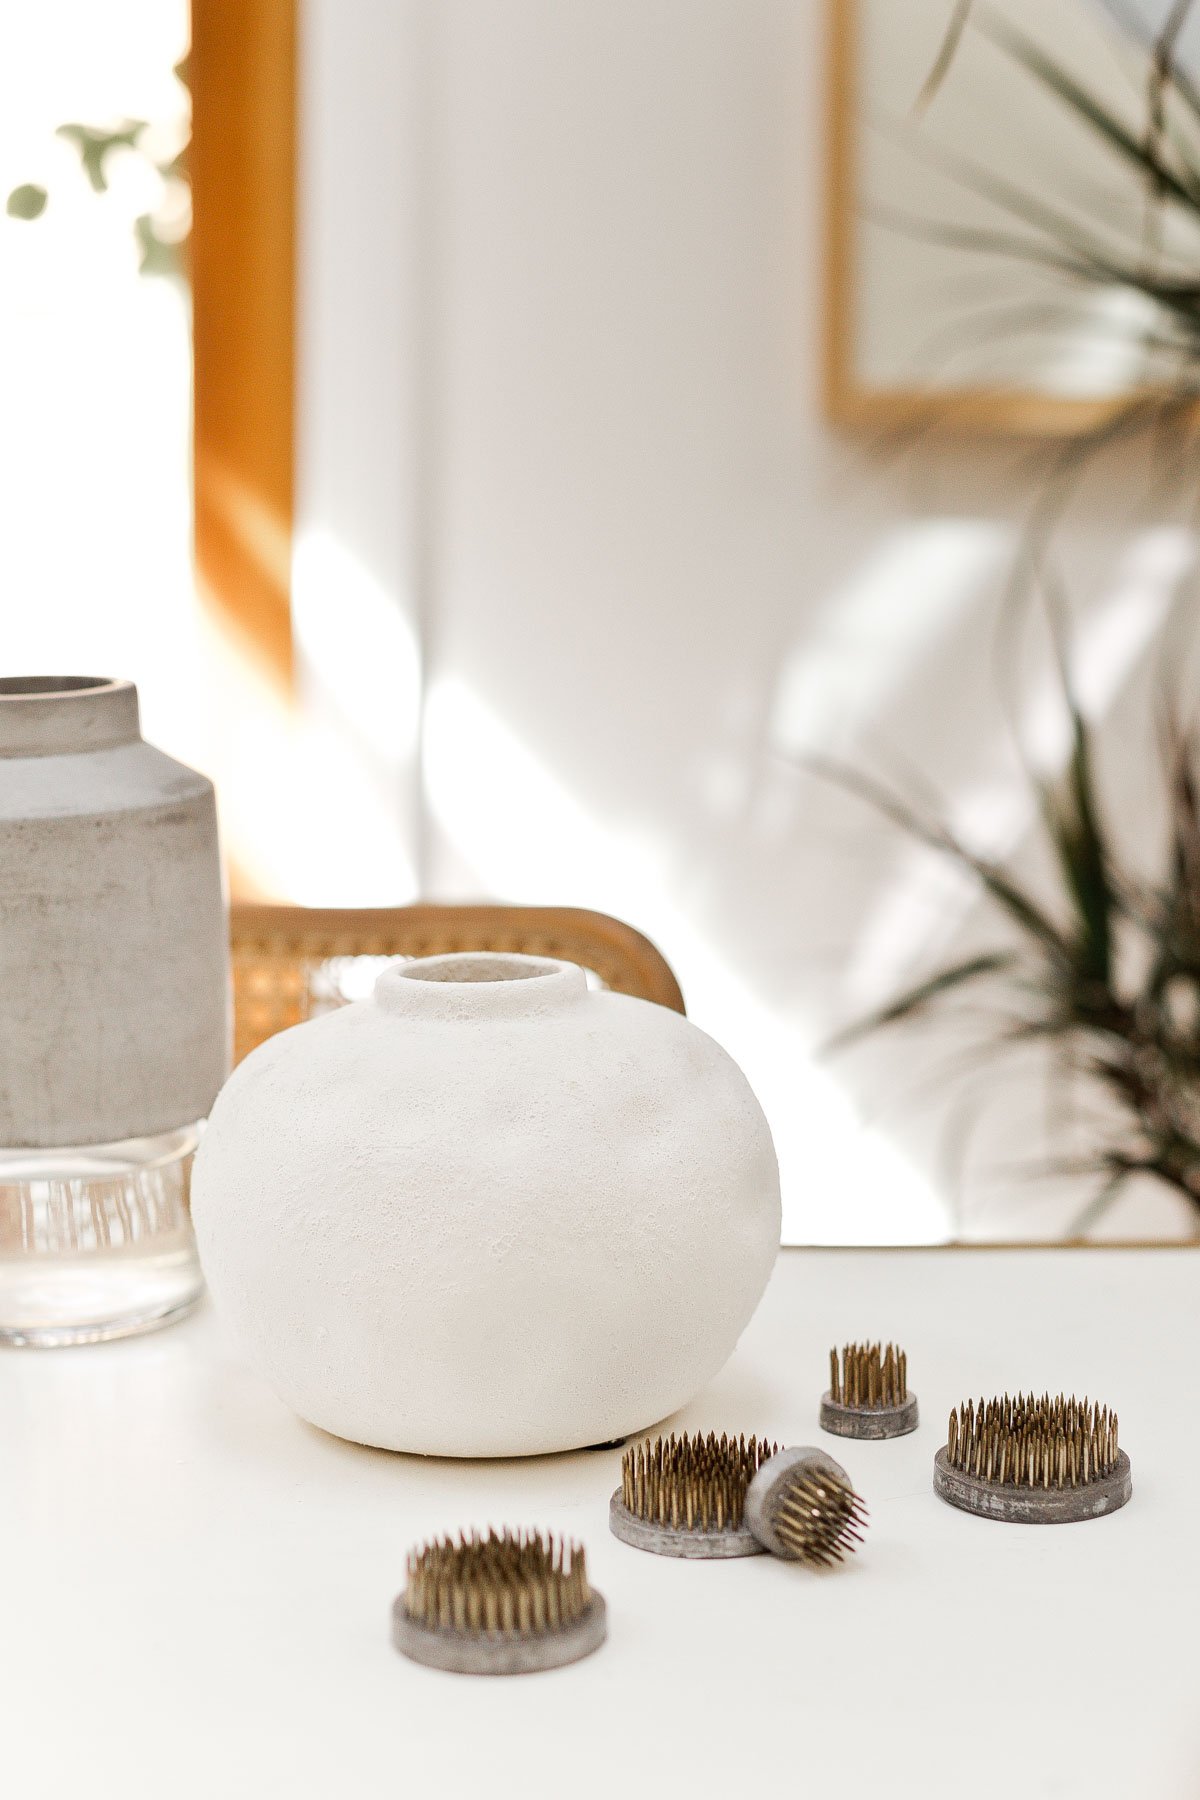
2. Whenever possible, use a flower frog.
I like the the pin holder varieties the best (the ones that look like a bunch of pointy nails sticking up), but there are other types of flower frogs as well. Ones that are more like cages, etc.
I have a handful of flower fogs in different sizes – small, medium, and large. That way, I can use one (or more) in almost any vase. As long as it’s not a clear vase, you can use one (or more) and no one will ever even know. They help keep flower stems in place and are especially helpful for vases that have wide openings.
They’ll also help you achieve that wild asymmetry I mentioned in flower hack number one.

3. Add a smaller vase inside a large vase.
I typically do this for two reason. One: So you can more easily change out the water. And two: So you can limit the number of flowers you end up using in an arrangement. A smaller vase inside a bigger one will make the mouth of the vase seem smaller, which will save you from having to endlessly add more and more and MORE flowers into a really large vase.
Also! Anything can become a vase when you use this method, which I think might be the best part. So, let’s say you want to use a cool woven basket as a vase. With this method, you can. Just add a smaller vase inside the basket, add your water to that vase, arrange the flowers and put the whole thing inside. No one will be the wiser and you won’t have a leaky basket. Haha. No one wants that.
4. Use the grid taping method.
If you don’t want to do the vase within a vase method, use a grid taping method instead. This is especially helpful for wide mouth vessels and vases. And helps stabilize your arrangements. Speaking of grid taping…

5. Keep floral tape and wire on hand.
I like to have clear, waterproof floral tape on hand for creating grid structures on top of vase openings. And green floral tape is perfect for stem wrapping, when needed.
Floral wire is nice to have around too, though not required. I like to use wire for securing broken stems or providing extra support for hollow stems, like ranunculus. You can thread the wire through the middle of the flower with a little U bend on the end. The U will hook into the flower and the longer piece of wire can thread through the middle of the stem.
6. Store arrangements in the fridge.
This is kind of a weird one, but if you’re making arrangements ahead of time for an event or party, you can store the completed arrangements in your fridge overnight to keep them fresh longer. I’ve done this many times (including when I made all of the floral arrangements for my wedding) and it works great.
Just try to avoid letting any of the flowers touch the walls of the fridge bc they’ll likely get too cold / freeze and turn brown or black any place that it touched the fridge walls for a prolonged period of time.

7. Add broken stem blooms to a shallow bowl of water.
There will always be a broken stem of two. Sometimes more.
Instead of throwing those flowers away, cut the tops off and throw them all into a shallow bowl of water. If you change out the water every couple of days, they’ll usually last 4-5 days this way and look really pretty too.
Bonus Tip: Add greenery from your yard.
Feeling like your flower arrangement still needs a little something? Try pulling a few small stems from your yard. I like to cut a particular tree in my yard with uniquely shaped leaves. The branches are very thin and the leaves are just a bit bigger than the flowers I like to use, so they work well together.
Try to find something that is lightweight and will compliment he flowers you already have.
And that’s it – my 7 flower hacks for arranging flowers like a pro. I hope you found some (or all) of these tips helpful for the next time you’re arranging. Let me know if you have any questions.


Wanna show some extra love on blog content you’ve really enjoyed?
Now you can! I’m excited to be one of Google’s paid early testers for their Thank with Google pilot program, which allows you to purchase virtual stickers to show support for posts that you’ve especially enjoyed / found helpful. Thank with Google is an experimental feature that I have early access to and get to test out here with you. So if you come across a DIY of mine that you’ve tried, a room makeover you love, or something that’s just inspired you in some way, you now have the ability to show your support in this new way.
There are a variety of stickers to select from (including a free option) and every time you send a paid sticker, you can add a personal message (which I love to read) or even ask a question that you’d like me to answer. For me, these virtual stickers translate to direct revenue for creating more of the content that you like most. So I hope you’ll give it a try.
You can find the Thank with Google feature as a button at the top and bottom of my blog posts now. Thanks as always for your support.

